
Creating content
As an author, you can create content by using predefined content types included with the Pega Knowledge application or additional content types that Pega Knowledge administrators create. You can use these additional content types to create content using specific templates and default content attribute values. You can use content templates to write articles, focusing less on formatting and more on the content itself.
With additional publish, schedule, display, and formatting options, you can ensure that your content is published when it needs to be, archived when no longer relevant, marked for review at an appropriate time, and visible to the proper audience. Read this topic to learn how to use these features to your advantage and streamline creating content.
To create a new article, in the Knowledge Portal, expand the Knowledge section on the left and then click Content. Next, click New content in the upper right corner to open the Creation/Draft page. You can also click +Create > Create Content in the upper left corner from any place in the Knowledge Portal.
Settings
When creating content, start with the Publish settings in the top right corner.
Select a Content type, which populates the content attributes with default values to save you time and ensure consistency. You can change these default values until you save or submit the content for approval.
You can associate content types with a content template. Consequently, selecting one now ensures that when you switch the content type later, the new templates will not overwrite your content.
If you select the URL content type, ensure to test the URL before publishing. To do so, save the draft, and then click Preview to view the content as a user would see it in your application. Verify that the URL redirects properly and that popup windows or other types of authentication do not block access to the content.
In the Language list, select the default language for the article. To post a translated version of this article in one or more additional languages, select the Add languages checkbox, and then click New translation. In the New translation dialog box that opens, select a language, click Add, and then click Submit. Now, another article will be automatically created in that language at the publish step for both new articles and article updates. With automatic translation enabled and configured, for example via a Google API, the article content will be automatically translated as well.
With Publish settings configured, you can move on to the following Schedule settings. Here, you specify when the article will be published. In the Publication list, select Upon approval to publish the article when approved. If you want to publish the article at a later date, for example, to coincide with a future release, select At selected time, and then click the calendar icon that appears to select a date when you want to publish the article.
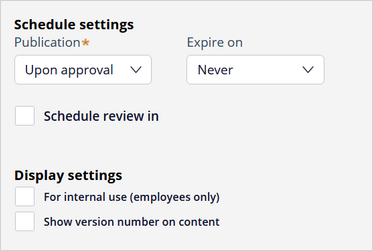
By default, articles never expire, which means they will not be archived. To plan ahead and ensure that an obsolete article does not remain active past its relevance, select At selected time from the Expire on list, and then click the calendar icon that appears to select a date. The article is automatically archived on this date and will no longer be available. You cannot pull articles from the archives, but you can publish a new version of an archived article by editing the article. If you do not decide to set an expiration date now, you can come back and set it at a later stage, even after the article is published.
To create an automatic content review notification in a specified time period: 3, 6, 12, 18, or 24 months, select the Schedule review in checkbox. On the scheduled review date, each author in the system that has a valid email address receives an email notification, and then the articles are routed to the Pending-Publish work basket. Similar to the expiration date, this option also ensures that the help content stays current.
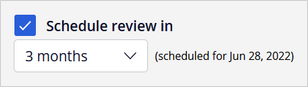
Nota: The Knowledge Portal calculates the notification date for automatic content review from the time of article creation, not publication. Selecting a future date for the article publication does not affect the review date.
Under Display settings, select the For internal use checkbox to display this content to only employees, which marks the entire article as internal. To make only parts of the content internal only, see the following Article content section.
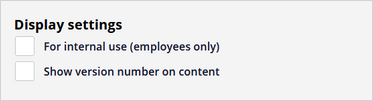
Select the Show version number on content checkbox to show the version number on the content page viewed by end users. This option is helpful if your organization is version oriented and you want to display version information for the content.
Article content
Next, you can proceed to provide the content of the article.
Tip: If possible, avoid special characters in the content title, abstract, and body. While permissible, searching for content with special characters requires that they are put in double quotes, e.g. "&".
Enter a clear and concise Title for your content. It will appear along with the abstract when searching for articles, so ensure that it represents the contents of the article.

When providing the title, use the Search for duplicates feature. When you enter the article title and move to the next field, the application displays the titles of articles with the same or similar title. To close the new article that you were about to create, click Resolve as duplicate. If necessary, modify the title and click outside the Title field to continue creating the article. You can also click Continue to continue creating the article with the same title. If the application finds an article that has a similar title, but is not a duplicate, ensure that the titles show a clear distinction between the articles. Edit the new article title if necessary.
In the following Abstract field, enter a brief description for your content. Again, the abstract will appear with the title when users search for articles. Ensure that the abstract accurately summarizes the content of the article. An abstract helps determine whether the article can help resolve a certain issue or answer a certain question. Do not just paraphrase the title. Expand on it, instead.
Click + Add category to select the right taxonomy categories to which the content belongs. The search results in the Interaction Portal display the first category added in this view for each article. Remember that when configuring the taxonomy. However, you can also filter the search results by category. Ensure that the article belongs to each category to which it applies.
Nota: The taxonomy configured by the administrator in the content type that you use using limits the categories available here. If the administrator did not assign any categories to the content type, you can select from all categories. If you change the content type to one that does not support the categories you selected for this article, you will receive a warning message.
Next, provide the body of the article and enrich it with multimedia, links, and references. Pega Knowledge offers a visual editor that has several formatting options to modify your content, as well as reference and link to other content. Start with the template associated with the selected content type or add another. Use snippets and reference other articles to maximize reuse. Use the remaining formatting features to hone your content.
Click the + icons in the following image to learn more about the content editor features and how to best use them to customize your content:
As you work on content that you have not yet saved, consider the following parameters:
- Content types--Changing the content type after you provide the content body erases that body and replaces it with the template of the new content type. If the new content type has no template assigned to it, or if the template assigned is Blank Template, changing the content type will erase all existing content. Either way, it will overwrite the body you have provided so far.
If the categories selected under the previous content type do not match the taxonomy of the new content type, you receive a warning message. The new content type will override the Publish settings, Schedule settings, and Display settings selected before. - Templates--Selecting a template inserts it into the body of the article wherever you place the pointer. It does not replace any content. You can select the Replace article content checkbox when selecting a template to erase content. It removes all content that you provided in the body, not just the previous template. Ensure to copy any content that you want to preserve before you select this checkbox.
Before you continue--and, in fact, as you write your content--Use the Preview feature in the top right corner of the application. The body of your article opens in a new window, where you can see the layout of the content, test all links, and open the referenced articles. Preview and test your articles before routing them for approval, especially for the URL content type.
Content references
Additional reference options are in the lower right corner, where you can add tags, files, links, and content to the article instead of in the body. The file, link, and content references provided here will be displayed when you select that tab while viewing the article.

Focus on Tags first. When searching for a published article, the application examines the article title, abstract, body, and tags to find a match. To make the article easier to find, add tags in the Tags tab in the lower right corner. Provide a tag in the text box, and then click Add. You can add more than one tag. In the tag, include the key aspects of the article and possible search queries that do not appear in the article title, abstract, or body.
To enrich your article with attachments, links, and references to other articles, use the Files, Links, and Content tabs in the lower right corner.
Go to the Files tab to add attachments to the article. You can upload files from your drive, which are then accessible with the published article to anyone viewing it.
Tip: Do not store large videos in the Pega Knowledge database as file attachments. Their size can potentially affect the application performance.
To add a link, click the Link tab, and then click Add. Use this option for links that do not have their place in the article content, but provide additional information and guidance related to the article. Enter a descriptive name for the link to make the destination clear.
You can also add references to related articles in the Content tab instead of placing them in the content. Click Add, and then, in the Add article references page, select the articles that you want to reference, and then click Submit. If the referenced article gets marked as internal or archived, it will be automatically removed from this section as well.
This concludes the flow of creating Pega Knowledge Content. All that remains is to click Submit in the lower right corner, which sends the article draft for approval.
This Topic is available in the following Module:
If you are having problems with your training, please review the Pega Academy Support FAQs.
¿Quiere ayudarnos a mejorar este contenido?