Importing content
Import content into Pega Knowledge from an external source, such as a legacy content system or a translation services vendor by using a predefined CSV file template. You can also update existing content using this file template. To import or update content, you download the CSV file template from the Knowledge portal, populate the file by mapping the data columns to your Pega Knowledge content structure, and then import the file.
The import process has the following restrictions:
- You can only import content by using the standard CSV file format.
- You cannot import file attachments. If an article has attachments, you can manually add the attachments after the import.
- You cannot import embedded images in articles. If the image is a link to an external repository, the link is imported.
Downloading the CSV file
Download the CSV template that is included in Pega Knowledge.
- In the navigation pane of the Pega Knowledge portal, click Knowledge > Content.
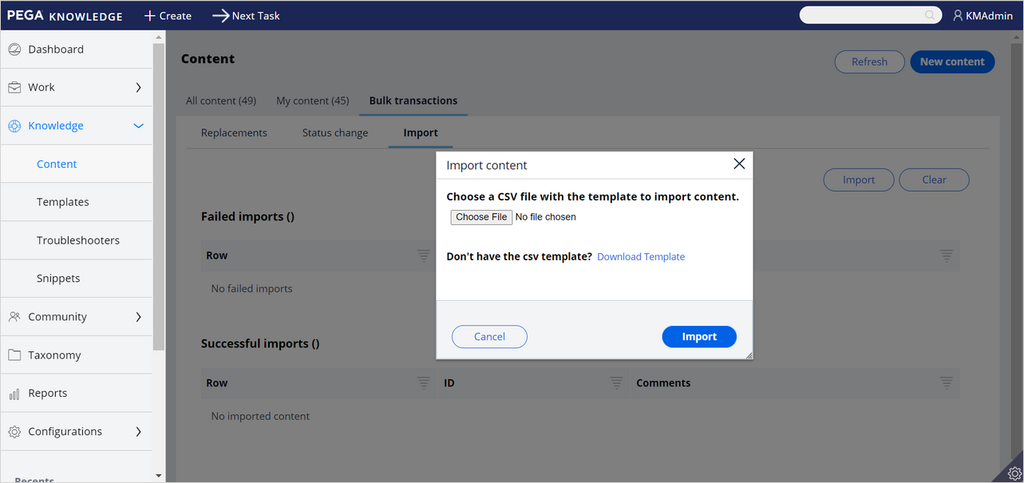
- Click the Bulk Transactions tab, and then click the Import tab.
- Click on Import.
- Click Download Template.
- Choose a location for the file download.
- Click Save.
The following figure shows the Import content dialog box:
Populating the CSV file
The CSV file template contains columns that represent the data that you map to your Pega Knowledge content data structure. Each row of the CSV file represents an article.
If the data columns do not match your existing data structure, you can update the template by adding additional data columns.
Note: When importing content, if you do not provide the content ID in the CSV file, Pega Knowledge creates a new content ID for the article. When updating content, if you provide the content ID in the CSV file, the new content replaces the existing content that matches that ID.
The following table lists and describes the data columns in the CSV file and indicates whether the system requires that data when you update or import content in Pega Knowledge:
| Data Column | Description | Required |
|---|---|---|
|
ContentID |
The content ID of the article in the Pega Knowledge portal. The ContentID should exist in the system, and the format should include the KC- prefix. For example, KC-123. |
Yes, if updating existing content No, if importing new content |
|
ContentTitle |
The title of the article. |
Yes |
|
ContentAbstract |
The abstract information for the article. |
Yes |
|
ContentType |
Enter the type of content (URL, Authored, or any other valid content type).
If you leave this column empty, Authored is the default value. |
Yes |
|
Language |
The default language for the articles. In most cases, English is the default language. To add another language, enter the two-character abbreviation for the language in the Language column. For example, FR for French. To view a list of two-character language abbreviations, in the Authoring portal, select Configurations > Languages. If you leave this column empty, Pega Knowledge uses the language specified in the pyDefault rule in D_KMApplicationSettings. If you are updating content, you can specify the associated language in the CSV file or edit the article in the Pega Knowledge portal before you import. |
No |
|
Category |
The category associated with the article. To associate an article with multiple categories, use comma-separated values in the CSV file. Spaces are not required after the commas. For example, Customer Service,General Q & A. If you leave this column empty when you import content, Pega Knowledge uses the Uncategorized category. If you specify a category that is not already defined in the Taxonomy, the category is not linked to the content, and you receive an Invalid category error. When updating content, if you add another category to the CSV file, the new category is added to the existing categories of the content. |
No |
|
Tags |
The tags or synonyms associated with the article. When you import or update content, you can add multiple tags as comma-separated values in the Tags column. Spaces are not required after commas. For example, travel tips, travel, foreign. |
No |
|
ContentBody |
The content of the article. Note: HTML tags are supported only in ContentBody because it uses the rich text editor (RTE).
|
Yes |
|
LinkToPrevious |
Use this column to import the remaining content when you have exceeded the 32,767 character limit (including spaces) and there are additional articles to import. Perform the following steps to import the remaining articles:
|
Yes, if you have exceeded the character limit and want to import the remaining content. No, if you have not exceeded the character limit. |
|
ReasonForEdit |
If you are updating existing content, enter the reason for the update. |
Yes, if updating existing content. No, if importing new content. |
|
FuturePublishTime |
The scheduled publication date for the article. |
No |
|
FutureExpireTime |
The scheduled expiration date for the article. |
No |
|
InternalContentOnly |
Indicates whether the article is set for internal use only. |
No |
|
ShowVersion |
The version number that is displayed on the article. |
No |
|
AttachedLinks |
The links that are associated with the article. |
No |
|
ReferencedArticles |
Other articles that are referenced in the article. |
No |
Adding additional attributes to the CSV file
If the data columns in the CSV file do not match your existing data structure, you can add data attributes to the CSV file that represent your existing data structure.
- Define the additional attributes that you want to add to the CSV file as properties of the PegaFW-KM-Data-ImportContent class.
- Map the newly created properties to the existing properties of the PegaFW-KM-Work-Content class or hierarchy:
- If you import new content, map the properties using the PrepareImportedContentWorkPage data transform.
- If you update existing content, map the properties using the KMUpdateContent activity.
- Add the new properties you created as column names in the CSV file.
- Upload the updated CSV file in the KMImportContentDetails binary file rule.
- To set the updated CSV file as the new predefined template, edit the KMImportContentDetails binary file rule, and then upload the updated CSV file in the rule.
Pega Knowledge users can now download the updated file template.
Importing the CSV file
After you populate the CSV file, import the file. This process imports the new content or updates the existing content in the Pega Knowledge portal.
- In the navigation pane, click Knowledge > Content.
- Click the Bulk transactions tab.
- Click the Import tab.
- On the Import page, click Import.
- In the Import content dialog box, click Choose file, select the CSV file to import, and then click Import.
- In the Web Options dialog box, click the Encoding tab.
- In the Save this document as: field, select Unicode (UTF-8).
- Click OK.
Successfully imported content moves to the Knowledge Content - Imported workbasket. If errors occur while you import the CSV file, error messages that describe the failure are displayed on the resulting Import page. Pega Knowledge generates a Content ID for each new article.
Viewing the import results
You can view the results of the import process on the Import page. This page shows successful and failed imports and includes the row numbers, generated IDs, and comments (error messages) of the imported rows.
You can open an article by clicking the ID number or navigating to the Knowledge Content – Imported workbasket. The content displayed in this workbasket is in the New-Draft stage, which allows you to continue editing, approving, and publishing the content according to the standard Pega Knowledge authoring flow.
You cannot update content that has a KC-xx ID and a status of Withdrawn, Archived, or Rejected.
This Topic is available in the following Module:
If you are having problems with your training, please review the Pega Academy Support FAQs.
Want to help us improve this content?